

Monday 30 January 2012
Beginners Sewing Supply List
We found these great sewing tips and instead of stealing them, we want to say thank you to Cold and Warm Crafts for putting them together.

Wednesday 25 January 2012
January 2012 Stitch Give Away!
Don’t let January give you the blues, we have a great
January give away!
Do you have
an iPhone 4? And do you enjoy stitching?
Four lucky
readers or tweeters can win one of our iPhone 4 Cross Stitch phone covers. At
the moment this is the ultimate crafter gift, you not only get to enjoy your favourite
past time, you also get to decorate your iphone with your stitched design..
Here’s a few we
found earlier...


It’s simple to Win!
Just Return
our special competition tweets on Twitter or leave a post on the this blog,Facebook or Google+
Entrants must
live in the UK to take part and win. Winners are selected randomly by
Random.org on Friday after 1pm.
Sunday 22 January 2012
Oilcloth Lunch Bag Tutorial
We predict 2012
is the year of oilcloth, forget the plastic tablecloths we remember as children
and acquaint yourself with the new fashionable oilcloth with gorgeous prints.


 Pin It
My love of
oilcloth started last summer at the SW Craft Club pop up summer events. I
brought 20 metres of oilcloth to cover each table for the event and besides
being a protective cover it also needed to look pretty.
Fast forward
to the winter and I have 20 meters of oilcloth gathering dust in my home, I’m
all about recycling and upcycling, so I researched the fabric further and what
it’s capable of and other than being referred to by lots of different names, I
also learn it can be waterproof, it’s wipeable,
it’s durable and I think fun! This Christmas my nearest and dearest
received oilcloth lunch bags and they look amazing! Even one of a male friend
has asked me to make a manly version for him (see below)
Still not
sure? Checked out the latest ranges from Cath Kidson, Boden and Lisa Stickly
and you’ll find very pretty bags, in all shapes and sizes, mobile phone holders
and aprons etc.
Like I said
2012 will be the year of the oilcloth and here’s how you can get involved. I
have to be honest, I’d like to pay homage to Martha Stewart, from where I
originally found this no brainer of an idea, for the lunch bag but her tutorial
isn’t as detailed as I need it, see below:
Cut main piece 29 1/2 by 8
inches and two side panels, each 12 1/4 by 5 inches.
1. Fold long panel, inside out,
into U shape with 5-inch bottom.
2. Make 1/4-inch cut at bottom
corners of side and middle pieces so bag folds smoothly. Sew-in side panels,
leaving 1/4-inch seam allowance.
3. Turn right side out and
top-stitch all around, 1/8 inch from edge.
I’m not sure if you are like me, but I need images or more
detail, either way, Martha you were a bit sparse on this occasion.
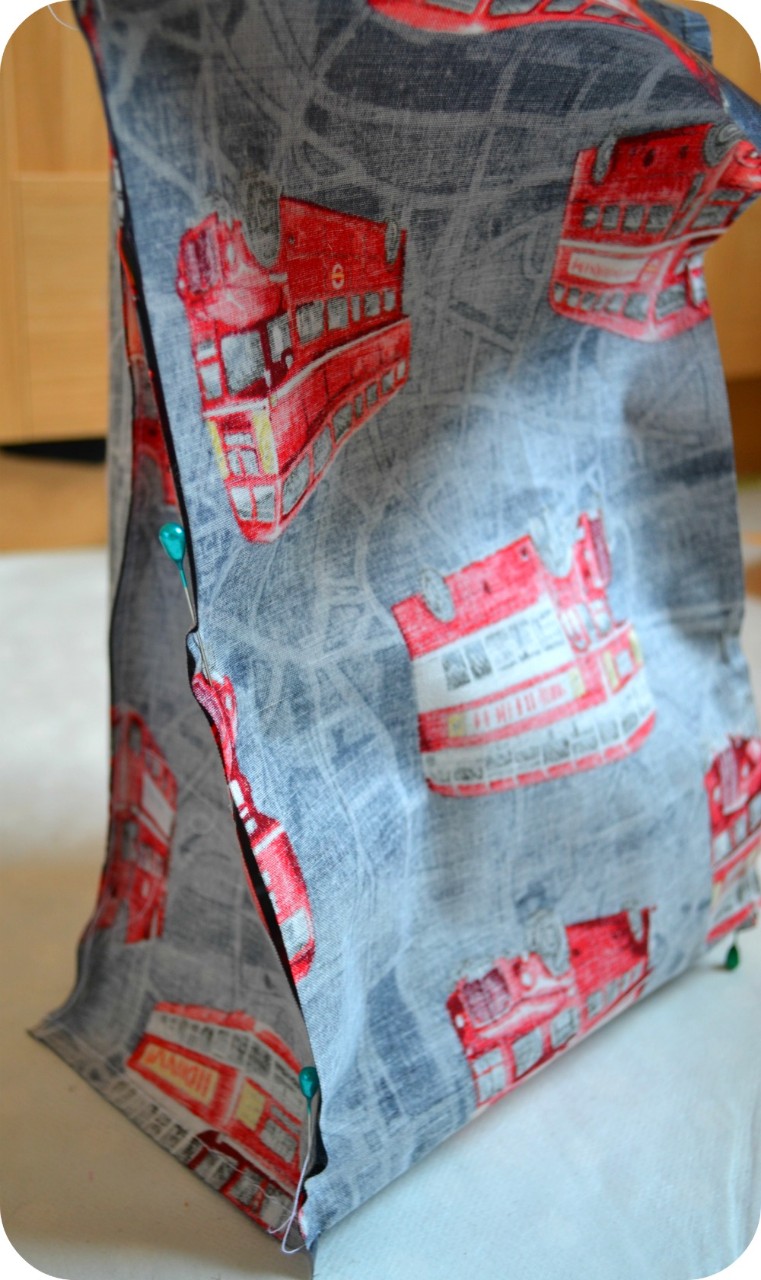
Below are my additional tips and images to help you to help
you to make your own oilcloth bag:
 |
| Finished. One waterproof manly oilcloth lunch bag |
Here's two I made earlier


...and we found more great examples on Pinterest
Monday 16 January 2012
Book Review: Pretty Pantry Gifts
Hello and
happy New Year to you all, I hope you have lots of crafting ideas for the year
ahead, stuck for ideas well why not try something new like making jams or
pickles. Have no idea where to start well then I have the perfect item for you.
Perfect Pantry Gifts by Tara Duggan is a beautiful kit that will get you well
on your way to making your jams, preserves and pickles.


This tiny
little book is not only packed with seasonal and all year recipes but also
advice on how to prepare and sterilize jars, food safety and the kind of
equipment that you will need.

The kit also
comes with an assortment of jar labels, tags, gift bags, matching ties and
cloth lid covers for you to create your gifts or maybe stock up of goodies for
yourself and brighten up your larder.
 |
| I know I did! |

I decided to
make the Lemon Curd from this book and I have to say the recipes in this book
are very easy to follow and I had this jar of delicious Lemon Curd whipped up
in no time.


I would give
this kit a 4 out of 5 stars.
Monday 9 January 2012
DIY Upcycled Picture Frame
I’ve been
inspired, last year I pulled together a pictorial post on chalk boards for our
sister site Craft Candy. The post had some great images of modern things people
are producing with chalkboards in mind, using slate, blackboard paint,
blackboard adhesive or by just recycling an old chalkboard, here’s the link:
Before you
chuck out your old belongings in January to make way for all of the new Christmas
presents, Don't! read my modern interpretation on the very boring chalkboard (how to upcycle something old into something new).
Equipment list
Old picture or mirror with an interesting ornate frame (Warning: do not use a plain frame, you’ll be disappointed)
Spray
paint
Hot glue gun
Blackboard adhesive and of course chalk.
I didn’t have
an old picture with a great frame at home and I really struggled to find one in
a charity shop which didn’t have an antique price tag attached to it! But and
after months of looking, I eventually found 3 frames at Columbia road market and
with a little haggling I got them for a price which meant I didn’t feel guilty
when spray painting them.

Start by
taking apart the picture and the frame and washing them both, if like mine, yours are old and dusty, they’ll be filled with lots of dirt and grease which your
paint and adhesive won’t stick to.

Spray the
frames, they’ll need 2/3 layers of spray paint. But with each layer, spray it
lightly and wait for it to dry before applying the next layer. Tip: if you
spray too much paint at once it will obviously take longer to dry but also the
paint will be too thick and runny!


Whilst you
are waiting for the frames to dry stick the adhesive to the picture. The
easiest way to do this to draw around the picture onto the reverse of the
adhesive and cut it out. Tip: pay
special attention when sticking I ended up with a few bubbles in mine because I
stuck it too quickly.


Finally, it’s
now time to glue your frame back together. I mainly used a hot glue gun, but one of the frames I had to unscrew and screw it back together again.


old picture upcycled and transformed
into a modern chalk board
Pin It
Subscribe to:
Posts (Atom)